使用 Spring 3 构建基于 HTTP 的RESTful Web Services

本文不讲述 RESTful Web Services 的概念和理论,你需要了解什么是 RESTful Web Services。

本文不讲述 Spring Framework 的使用和技巧,你需要熟悉 Spring Framework 和 Spring MVC。

本文内容主要是简单说明使用 Spring 3 来构建一个简易的 RESTful Web Service 相关内容。

Spring 自版本3开始增加了对 RESTful Web Services 开发的支持,且 REST 已被无缝整合到了 Spring 的 MVC 框架中,因此在 Spring 中创建 RESTful Web Services 是十分容易的。这主要体现在:

  • 通过 @RequestMapping, @PathVariable, @RequestBody, @ResponseBody 等注解(Annotation)可以简单的创建资源标识和URI映射
  • 丰富的数据载体支持,比如 XML、JSON
  • 完全采用 Spring MVC 模型进行开发,使用 Spring 开发的应用可无缝过渡到 REST


下面通过一个例子来说明使用 Spring 3 创建一个 RESTful Web Service 需要的操作。

对于本例的几点说明:

  1. 通信协议为 HTTP 协议;
  2. 参数类型为 JSON 格式;
  3. 例子中的代码均采用省略的写法,只写出需要注意的部分;

代码依赖

  • spring-webmvc
  • jackson-core-asl
  • jackson-mapper-asl

如果使用 Maven 的话可以参考如下配置:

1
2
3
4
5
6
7
8
9
10
11
12
13
14
15
<dependency>
<groupId>org.springframework</groupId>
<artifactId>spring-webmvc</artifactId>
<version>3.2.4.RELEASE</version>
</dependency>
<dependency>
<groupId>org.codehaus.jackson</groupId>
<artifactId>jackson-core-asl</artifactId>
<version>1.9.13</version>
</dependency>
<dependency>
<groupId>org.codehaus.jackson</groupId>
<artifactId>jackson-mapper-asl</artifactId>
<version>1.9.13</version>
</dependency>


Java 实现

本例中我们假设只有一个 Entity 对象 Customer,实现如下:

1
2
3
4
5
6
7
8
9
10
11
12
package demo.rest.model;
public class Customer {
private long id;
private String name;
private String mobile;
private String address;
private String email;
// omit implementation of Getters and Setters below
// ......
}


同时,针对 Customer 的持久化操作实现 CustomerRepository 大致如下:

1
2
3
4
5
6
7
8
9
10
11
12
13
14
15
16
17
18
19
20
21
22
23
24
package demo.rest.repo;
public class CustomerRepository {
public Customer query(long id) {
// omitted
}
public List<Customer> queryAll() {
// omitted
}
public void add(Customer customer) {
// omitted
}
public void update(Customer customer) {
// omitted
}
public void remove(long id) {
// omitted
}
}


阅读全文

VIM技巧:多行操作

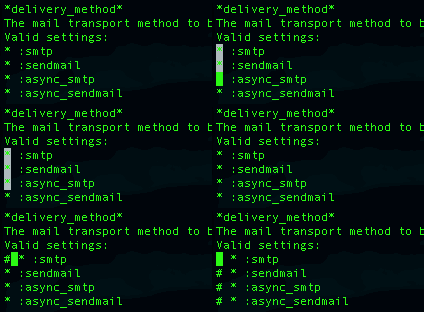
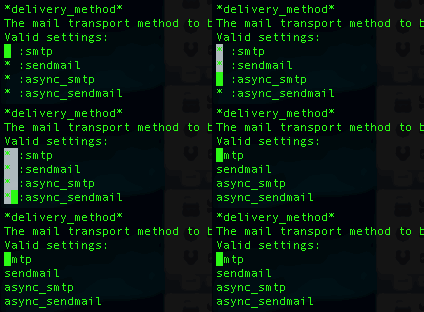
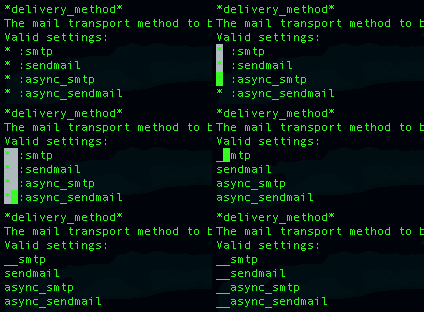
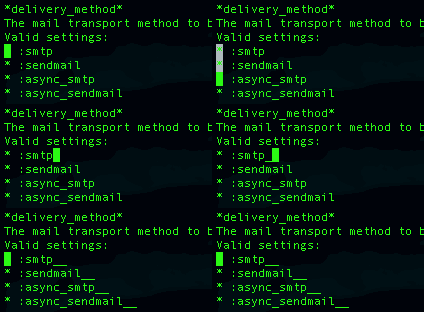
Ctrl + v 进行列操作

按下 Ctrl + v 后移动光标,然后按 I 插入内容,按 Esc 结束。

insert columns

按下 Ctrl + v 后移动光标,然后按 x 删除所选内容。

delete columns

按下 Ctrl + v 后移动光标,然后按 c 替换所选内容,按 Esc 结束。

modify columns

按下 Ctrl + v 后移动光标,按 $ 移至行末,然后按 A 追加内容,按 Esc 结束。

append columns

Ctrl + v 还何以有更多种用法,请自行发掘。

用替换正则表达式的方式操作

替换行首占位符 ^ 来实现插入内容到行首。

1
:s/^/#/g

替换行末占位符 $ 来实现追加内容到行末。

1
:s/$/\/\/comment/g

操作指定区间的行。

1
:35,39s/red/blue/g

本例是将第35行至39行的内容中所有的 red 替换为 blue

通过替换正则表达式,可以实现各种操作,请灵活利用。

让UILabel根据内容自动调整大小

固定宽度的UILabel让内容自动换行并根据内容变更高度

1
2
3
4
5
6
7
8
9
10
11
12
13
14
NSString *str = @"UILabel中显示的内容,达到UILabel设置的最大宽度时,自动换行";
UIFont *font = [UIFont systemFontOfSize:14]; //内容采用的字体大小
CGFloat height = [str sizeWithFont:font constrainedToSize:CGSizeMake(280, CGFLOAT_MAX) lineBreakMode:NSLineBreakByWordWrapping].height; //根据文本内容计算高度
UILabel *label = [[UILabel alloc] initWithFrame:CGRectMake(0, 10, 280, height)]; //根据计算的高度创建UILabel实例
label.font = font;
label.numberOfLines = 0; //必须定义这个属性,否则UILabel不会换行
label.textColor = RGBCOLOR(102, 153, 102); //内容文本颜色
label.textAlignment = NSTextAlignmentLeft; //内容文本对齐方式
label.text = str;
[self.view addSubview:label];

单行显示的UILabel根据内容变更宽度

1
2
3
4
5
6
7
8
9
10
11
12
NSString *str = @"UILabel中单行显示的内容,UILabel将会调整宽度为本文长度";
UIFont *font = [UIFont systemFontOfSize:14]; //内容采用的字体大小
CGFloat width = [str sizeWithFont:font constrainedToSize:CGSizeMake(CGFLOAT_MAX, 20)].height; //计算单行显示时文本所需的宽度
UILabel *label = [[UILabel alloc] initWithFrame:CGRectMake(0, 10, width, 20)]; //根据计算的宽度创建UILabel实例
label.font = font;
label.textColor = RGBCOLOR(102, 153, 102); //内容文本颜色
label.textAlignment = NSTextAlignmentLeft; //内容文本对齐方式
label.text = str;
[self.view addSubview:label];

读取 .plist 文件内的数据

有时会将静态数据存放到 .plist 文件中,就需要读取 .plist 文件作为数据源。
如果对 .plist 文件打开方式选择Source Code,你会看见它其实是一个xml文件。

读取 .plist 文件的方式如下,

1
2
3
NSString *plistPath = [[NSBundle mainBundle] pathForResource:@"listFileName" ofType:@"plist"];
NSArray *array = [[NSArray alloc] initWithContentsOfFile:plistPath]; //读取到数组
NSDictionary *dictionary = [[NSDictionary alloc] initWithContentsOfFile:plistPath]; //读取到字典对象

就这么简单。
另外,从 NSDictionary 中拿数据的方式如下,

1
2
3
NSDictionary *userDict = [dictionary objectForKey:@"Users"];
self.userNameLbl.text = [NSString stringWithFormat:@"%@", [userDict objectForKey:@"Name"]];
self.userNumberLbl.text = [NSString stringWithFormat:@"%@", [userDict objectForKey:@"Number"]];